How to Check Whether a WordPress Page Is Indexable
How Can You Tell If a WordPress Page Is Indexable?
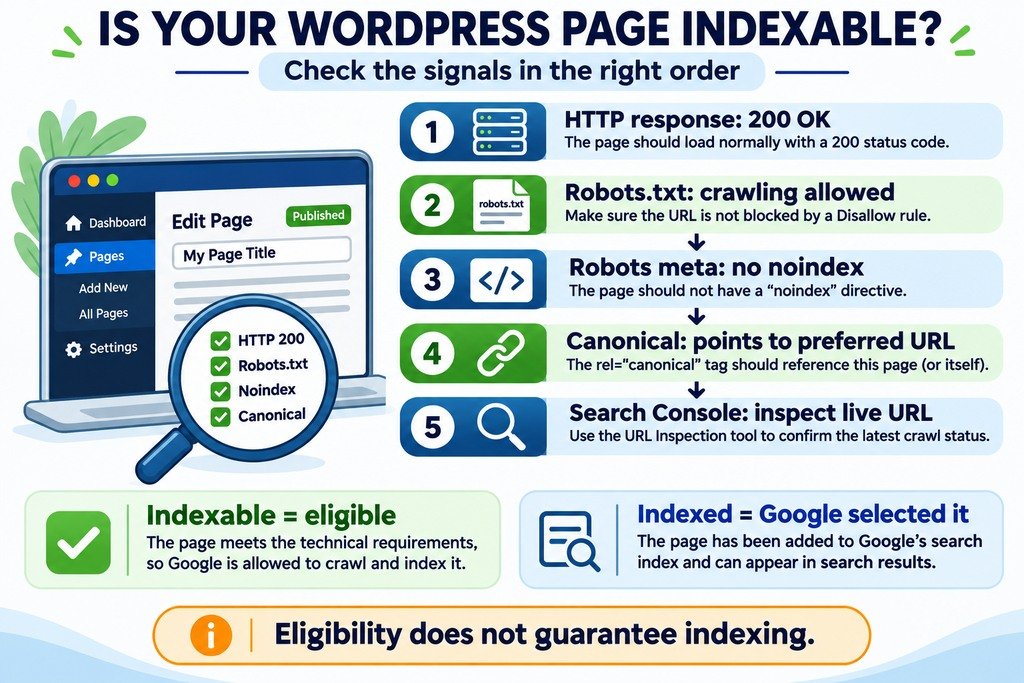
A WordPress page is technically eligible for Google indexing when it is publicly accessible, returns a successful HTTP response, allows Googlebot to crawl it, and does not carry a noindex directive. Also check whether its canonical tag identifies the URL you want Google to show. Confirm these signals in the published page, then use Google Search Console URL Inspection to compare live eligibility with Google’s recorded indexing status. Being indexable does not guarantee being indexed.
Check WordPress Indexability in the Right Order
You have published a WordPress page, but it is not appearing in Google. Before rewriting the article or repeatedly clicking Request indexing, establish whether Google is actually allowed to index the URL.
Start with the Website Indexability Checker as a preliminary external review. Its results do not replace your WordPress settings, response headers, or Google’s own URL Inspection data.
Step 1: Confirm the Page Is Published and Public
In the WordPress dashboard, open Pages → All Pages (or Posts → All Posts) and locate the specific URL. A Draft or Pending page is not the public page you intend Google to index. A password-protected or private page is not suitable for public search indexing either.
- Check that its status is Published.
- Confirm visibility is Public, not Private or Password protected.
- Click View and open the actual permalink in a signed-out browser session. Do not rely on an editor preview link.
- Verify that the page loads the intended content rather than a login form, an error template, or an unexpected redirect.
Step 2: Check the Site-Wide Search Engine Visibility Setting
Go to Settings → Reading and find Search Engine Visibility. On a public site that should appear in search, the checkbox labeled Discourage search engines from indexing this site should normally be unchecked.
WordPress can output a site-wide robots noindex instruction when this option is enabled. The setting is a request to search engines, not password protection. It is frequently worth checking after a staging-to-production migration, site restoration, or development handoff.
Do not uncheck it indiscriminately. A private test installation may deliberately discourage indexing. Make sure you are editing the live public site and understand why the preference was enabled.
Step 3: Verify the HTTP Response of the Exact URL
A normal indexable HTML page should return HTTP 200 OK when requested successfully. A browser can display content while a redirect or error response changes what Google sees, so examine the status of the precise URL rather than assuming a visible page is fine.
| Response | What it usually means | What to check |
|---|---|---|
| 200 | Successful request; proceed to crawl and robots checks. | Ensure the content is a real page, not an error message served with 200. |
| 301 / 308 | Permanent redirect to another URL. | Inspect the final destination instead of expecting the old URL to be indexed separately. |
| 302 / 307 | Temporary redirect. | Confirm whether the redirect is intentional and where the request lands. |
| 401 / 403 | Authentication or access restriction. | Review membership, security, firewall, and bot-access settings. |
| 404 / 410 | Not found or gone. | Correct the URL or restore the content if it should exist. |
| 5xx | Server-side failure. | Check hosting logs, plugin errors, and intermittent outages. |
The Bulk HTTP Status and Redirect Checker can help identify response chains and unexpected redirects. Remember that a public checker sees its own request; a firewall may treat Googlebot differently.
Step 4: See Whether Robots.txt Blocks Googlebot
The site’s robots.txt file can tell Googlebot not to crawl particular URL paths. Open https://example.com/robots.txt using your own domain, then look for a rule that matches the page you are checking.
For example, a rule that disallows an entire public service directory could prevent Googlebot from reading those service pages:
User-agent: Googlebot
Disallow: /services/
This example would be a problem if /services/roof-repair/ is meant to be indexed. Robots matching rules are more nuanced than a simple text search, so evaluate the effective rule for the precise URL. Use the Robots.txt Generator and Tester as a working aid, and confirm crawl allowance in Search Console.
Important: robots.txt is a crawling control, not a dependable way to keep a URL out of Google results. If a blocked page also has a noindex tag, Google might be unable to crawl it to read that tag.
Step 5: Look for a Noindex Instruction in HTML or Headers
Open the public page, view its HTML source, and search for name="robots", name="googlebot", and noindex. A common page-level directive looks like this:
<meta name="robots" content="noindex">If Googlebot can crawl the URL and encounters that instruction, the page is not eligible to be indexed. The same instruction can also appear in an HTTP response header:
X-Robots-Tag: noindexChecking only the visible HTML can miss an X-Robots-Tag set by a server configuration, CDN, or security layer. Review both locations. Conversely, do not assume that the mere absence of an explicit index meta tag is a problem; indexing is the default when no blocking rule applies.
Step 6: Check Rank Math or Other WordPress SEO Settings
On a site using Rank Math, edit the affected page and inspect Rank Math SEO → Advanced → Robots Meta. Make sure that No Index is not selected for a page that should be indexed. The interface can differ by editor, plugin mode, and version.
If that individual page is configured correctly, also review Rank Math SEO → Titles & Meta for defaults affecting its post type or taxonomy. Themes, plugins, and custom code may also produce conflicting directives.
Step 7: Check Which URL the Canonical Tag Prefers
A canonical link helps search engines recognize the preferred version of similar or duplicate content. In a normal standalone WordPress page, you generally want the canonical URL to point to that page’s intended public permalink:
<link rel="canonical" href="https://example.com/services/roof-repair/">Suppose the article is published at /services/roof-repair/, but its canonical points to /services/. Google may treat the detailed page as an alternate to the parent page rather than select it as a separate result. First decide whether the two pages are intended duplicates.
Check for conflicting canonical tags, HTTP-to-HTTPS inconsistencies, unexpected query-string variants, and plugin settings. The Canonical Tag Checker can support that review. A canonical tag is a signal, not an absolute indexing command; Google may select another canonical.
Step 8: Compare Live Eligibility With Google Search Console
Now open your verified Google Search Console property and use URL Inspection on the full URL. The first report describes Google’s recorded information from its previous processing of that URL. Click Test Live URL to check its current accessibility and certain indexing signals.
- Inspect the exact HTTPS permalink that you want indexed.
- Read the Page indexing section, especially crawl allowance, indexing permission, and canonical details where available.
- Run the live test if the page has changed since Google’s last crawl.
- Check the returned HTML, resources, and screenshot where available to see whether the main content appears in Google’s rendered view.
- Compare the user-declared canonical with the Google-selected canonical in indexed-version data when shown.
- If the page is genuinely valuable and technical barriers are fixed, request indexing once and monitor the status.
A passing live test does not mean the URL is indexed. It also cannot predict Google’s final canonical choice, evaluate every quality consideration, or guarantee that the page will enter the index. Historical reports may retain an earlier noindex state after you fix the live page.
What Different Results Mean for Your Next Action
| What you find | Likely next step |
|---|---|
| Page is a draft, private, or behind a login | Publish publicly only if appropriate; don’t expose content intended to stay private. |
| Global WordPress indexing discouragement is on | Disable it on the public production site if the setting was accidental. |
| Noindex meta or header is present | Find the responsible SEO, theme, server, or CDN setting and correct it. |
| Googlebot is disallowed in robots.txt | Change the matching rule when crawling should be allowed. |
| Canonical points to a different page | Decide whether the pages are genuinely duplicates and align preferred URL signals. |
| Live test succeeds, but URL is not indexed | Review uniqueness, usefulness, internal links, and Google’s chosen canonical rather than assuming a block. |
Technical Eligibility Is Only Part of the Indexing Decision
Once the blocking issues are ruled out, review how visitors and search engines reach the page. A useful page buried several clicks deep, missing from relevant navigation, or competing with many near-identical URLs may be harder for Google to discover or select.
Add descriptive internal links from genuinely related pages. The Internal Links and Anchor Text Analyzer can support an internal linking review. Check that your XML sitemap includes the canonical, indexable URLs you care about, and use the XML Sitemap Validator to review its structure.
A Practical WordPress Example
Imagine you have published an original page at https://example.com/services/roof-repair/. It opens when you are logged in, but its URL is absent from Google.
First, open it in a signed-out session and confirm it returns 200. Next, inspect Settings → Reading and page-level Rank Math robots settings. Then examine the live HTML, any X-Robots-Tag header, and the applicable robots.txt rules. Finally, compare its canonical URL and Search Console inspection results.
If the page’s public response contains noindex, that is a concrete technical blocker worth fixing. If there is no blocker and Google’s live test passes, investigate whether the page overlaps with another service page, lacks useful detail, or needs better contextual internal links. The same symptom calls for different fixes depending on the evidence.
Frequently Asked Questions
Does a published WordPress page get indexed automatically?
No. Publishing makes the page available according to its visibility and server settings. Google still has to discover, crawl, evaluate, and potentially select it for indexing.
Do I need to add an index meta tag?
Usually not. Google does not require an explicit index directive. What matters is the absence of a conflicting noindex instruction and other indexing barriers.
Can a page return HTTP 200 but still be excluded?
Yes. A 200 response does not override noindex, crawl restrictions, canonical selection, or Google’s assessment of the content. Even an error-like page can return 200, which is why the actual content also matters.
Is a self-referencing canonical required for indexing?
No. It is a useful way to state a canonical preference, but it is not a formal requirement for every page. Canonical annotations are signals; Google can determine a canonical independently.
Will requesting indexing fix a WordPress noindex problem?
No. First remove the actual blocking directive and verify the public response. A request is not a guarantee that Google will index the page.
Final Check Before Requesting Indexing
For an important public WordPress URL, confirm five things: it serves the intended page with HTTP 200; Googlebot is permitted to crawl it; neither HTML nor HTTP headers specify noindex; its canonical signals identify the preferred URL; and Google Search Console’s live inspection finds no obvious access problem.
Official Documentation
- Google Search Central — Technical requirements for indexing
- Google Search Console — URL Inspection tool
- Google Search Central — Block search indexing with noindex
- Google Search Central — Canonical URL guidance
- WordPress.org — Settings → Reading
- Rank Math — Review a WordPress page’s indexing directives